top of page


Disney's Wish

Disney's "Wish" (2023)
Working on Disney’s latest feature film Wish, has been an incredible journey. Not only did every artist on the team have to learn a new way to lighting in order to achieve the stylized look of the film, but we also had to rethink our approach in every shot.
Lighting and compositing on Wish allowed me to realize how grand this team was and how spectacular the end result was going to be. It was amazing once again to be a part of something so breathtaking. There were times where things were out of my control and I had to roll with it and explore quick and effective solutions in order to meet the deadlines for my shots. This allowed me to continue to get better at pacing myself per shot; keeping my energy strong and my enthusiasm sparkling :)
This film was incredibly fun to work on, and despite working remotely for Disney, I always seem to get closer and closer to the team of lighting artists. This has been a dream come true and a dream that continues to grow.

Some shots I worked on!
click to enlarge

Breakdowns
1st iteration below


1/1
Final shot below
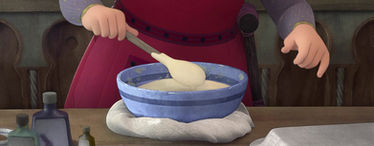
These shots were so joyful! Warm, enticing and inviting, they were ready to receive some love! I started off with the foundation key that was created by the absolutely amazing lighting artist Jorge Obregon. My supervisor Justine and I leaned towards having a darker SR side of Sabino’s face, introducing more cools on that side, while also maintaining some interest on Asha’s hair by adding in some rim highlights to shape her braids and lift the darks a bit. I had fun with the environment as well by brightening some of the sun hotspots and playing around with the shadows on the SL plates and cups.
1st iteration below


1/1
Final shot below
Moving on to this next shot of Asha, it was important for me to maintain the balance of color between Asha’s skin from when she has her head down to when she moves her head upwards. This took a bit of positing extra lights under her and animating them to achieve that nice balance so that she is not completely in the dark when her head is angled downwards.
Here I also played Sabino just a touch darker than in the previous shot so that we can give the spotlight to Asha and Valentino (the goat). The environment started off very dark and cool so I went ahead and added in some sun hitting the window frame and top of the sink from the outside and brightened up the interior’s shadows quite a bit. Adding in some atmo allowed me to also enhance that softer feeling to the environment.
1st iteration below


1/1
Final shot below
And here we go! I wanted a challenge and well, I definitely got a challenge with this shot haha
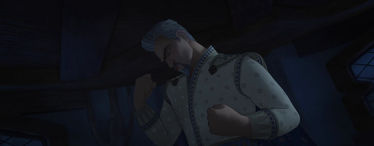
This shot was quite short (about 1 second short to be exact), however despite this, it definitely had various elements going on that I needed to integrate well. My first step was to get the environment and Magnifico lit and consistent to the other shots, disregarding the effects for now. This allowed me to focus on getting the main lighting down quickly enough to show to my supervisor and get that approved and ready for when the FX artist published an update to the wish bubble and green flash. The FX artist on this shot did an AMAZING job creating the bubble and green flash.
Some complications I tackled on this shot revolved around the bubble not rendering out correctly. Here, I had to figure out whether it was an issue I caused and need to track down in Maya, my lighting setup or overall settings, OR, whether it was a technical issue needing further investigation from either the FX artist or a General Technical Director (TD). Eventually, we found that it was a deeper technical issue that was complicating the smooth transition between the FX artist’s approved version of the bubble properly loading into my scene. I had to communicate with them and go back and forth and thankfully was able to resolve this issue and finally get back to the creative side of things.
For this shot, I was able to analyze the already established style and color of the green flash being associated with Magnifico. Talking to more senior artists and how they went about the flash allowed me to stay consistent with the look, lighting and color of the green flash FX. In the final approved image, I was able to apply what I learned from my chats with the more senior lighting artists and was able to integrate the flash and bubble well. I made sure to brighten up those edges of the bubble as it's tearing apart and make the overall bubble bright enough to still be seen against the green flash.
Overall, this shot took both technical and creative problem-solving and despite the short time frame for this shot, it still made a BANG!


1/1
1st iteration
Final shot
This was my absolute FAVORITE shot that I worked on. This shot came with it all, the challenges, the technical and creative problems, tighter deadline because it was going to be used for the trailer coming out soon, getting the timing of the animated lights feeling right and more :)
I started this shot off just like the others with FX elements, getting the characters and environment feeling consistent to the surrounding shots first. With that approved, I was able to start working on the FX and its integration between Magnifico and the environment. I created several green lights in Maya to be able to play around with them in Nuke. It was much faster that way and allowed me to have iterations ready for discussion between myself and my supervisor. I created extra green lights on Magnifico just in case I didn’t have enough time to render my shot out again before the next dailies.
I also did some snooping around and was able to find that one of my old mentors from Encanto, Mason, worked on one of the establishing shots of Magnifico and the green FX. I went ahead and immediately communicated with him to get some advice. After several iterations later and some back and forth between fellow artists, my supervisor and Director of Cinematography, I was able to get the timing down for the animated green lights on Magnifico.
Fun fact!
There is a red ball of yarn thrown at Magnifico. After this shot was approved by the directors, we realized that the ball of yarn was missing the loose string that appears in the next shot with Star. This was quite intense because I now had to re-render Magnifico’s render layer again to include this new ball of yarn with the loose string. Looking back, that was definitely a rush and was glad to able to accomplish everything within the set timeframe. This shot pushed me so much and allowed me to prove to myself and my supervisor that I was truly capable. Of course, there are so many little things I wish I can go back and re-adjust, but I did the best I could for the time constraint I had. I overall feel amazing for creating this final look with the help of everyone.
bottom of page


