top of page


Blue Sky Mentorship Program: "The Procrastinator" Blog
References by the artist Yaoyao Ma Van As


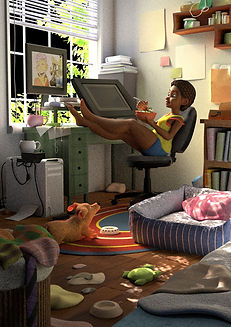
Saludos! I was fortunate enough to be a part of the Mentorship Program at Blue Sky Studios for summer 2020! As a Lighting Mentee, I decided to recreate an illustration from the AMAZING artist Yaoyao Ma Van As.
My goal was to create entirely all four shots with a bit of a twist! I have finalized the midday shot with the help of my mentor and will continue to work on the other shots so stay tuned!

That's me!
featuring my sister's doggie Ace!

Of course, at the start of every project, I love creating a spreadsheet and really analyzing exactly what is in the scene, it's placement, what is it's purpose, and it's textures.
It's a great way to keep myself on track, motivated, and feels pretty nice checking a box and turning it green haha.
This is also a great place to jot down the notes and feedback I received on a daily basis from my mentor at Blue Sky Studios.
This new project required me to build everything from the ground up. Although I was itching to get started with the lighting right away, I was super excited to model everything out with the exception of the chair, Mac tower, and dog bed all of which I got from turbo squid to help speed up the process. The dog is also a free rig created by Brandon Schaal.


Final Look for the modeling
The girl, I decided, to really make my own and incorporate my culture by creating a typical Dominican young adult, relaxed with her hair done up in a tubi.
Texturing Time!


.jpg)
.jpg)

Through a ton of back and forth with my mentor, I was able to adjust the shaders and textures of each object according to the reference. I did most of my textures in Substance Painter as well as procedurally.
Lots of iterations later, we were able to finalize the look of the skin and everything else so that I can continue to move forward with lighting!
Let's Light!
Finally getting to this stage felt GREAT. Being in my comfort zone and whatnot. haha WRONG. My mentor made sure that I really stepped out of my comfort zone and tackle my week points which I truly appreciated.
So instead of starting with the eye-catching lighting effects first (gobo and wall light), I started by analyzing the position of the sun in this shot. Locating the position of the sun helped me determine the area I should place my lighting for the overall base to feel right.


My mentor was able to help guide me in creating quick lighting tests to figure out the best angle of the light that illuminates the desired spots in the room. By eliminating all bounces of the light, experimenting with spot and area lights and focusing only on this one light (turning off the skydome), we were able to finalize one angle and move on to the next light.


Ah yes, my favorite part ^_^. I had so much fun creating this gobo! My mentor was able to guide me in this area by referencing real-life natural gobo effects. I spent a bit of time in photoshop creating some versions and testing them out in Maya, stacking gobos on top of one another, blurring the edges, etc. Really studying the way gobos appear naturally.


Overall, I experimented a lot with the placement of lights, types of lights, bounces or no bounces, and adjusting textures along the way. A great way to speed up the process when adjusting lights is by hiding everything in the scene that is not crucial and focusing on how the light reacts to the main objects. By using this method, I was able to provide my mentor with quick renders using Arnold for our critique sessions throughout the week.


After finalizing the main lighting and feel of everything, I went in to add some small rim lights to the areas that were not touched such as the hamper and bed. I set up my render layers, figured out where most of the noise was coming from and finally sent my passes to render.
These are all of the final individual lights I used in this shot.
Bringing it all Together!
Compositing in Nuke
I brought all of my render layers into Nuke and got started right away in compositing. I made some small color adjustments here and there, added subtle Z Defocus, volume ray, and the sky in the background.
(Note: This is an older style of how I used to comp)
End Result
And here is the final look! I feel super proud of this piece!
bottom of page